
Introduction
Last updated on 2026-06-19 | Edit this page
Overview
Questions
- Why is training on a real HPC challenging for workshop instructors?
- What hardware is needed to build a mini-HPC for training?
Objectives
- Explain the challenges of using a real HPC for training purposes
- List the minimum hardware components needed for a Raspberry Pi mini-HPC
The first thing to do is to get all learners to plug in the hardware for their cluster. On its very first boot, the Pi automatically expands the root filesystem to fill the SD card. This can take a minute or two, during which the network interface will not yet be up.
This is a good time to deliver the lesson introduction. By the time you have finished, the Pi will be ready to connect to.
When running a workshop to teach learners how to use an HPC, an instructor is immediately presented with a few problems:
- Very few users ever get to see an HPC in real life and it is left to imaginations and sci-fi movies to visualise what an HPC is. To many this is quite a scary concept.
- Training on a “real” HPC can cause learners to be anxious that they might “break” something.
- Access to an HPC needs to be arranged. This is not always a trivial task as the use of HPC resources can be quite restricted in terms of who are allowed to use a specific HPC.
- Workshop attendees often do not read their emails requesting them to create accounts before they turn up for the workshop which results in instructors having to create accounts on the day. Apart from quite often delaying the start of the workshop, it is also not always possible for instructors to create the user accounts on the day.
- HPC resources are always in demand and running a workshop on a “real” HPC takes resources away from “real” processes running at the time.
- HPCs typically have to be connected to via the Internet. Any issues with accessing the Internet will affect the workshop.
- If an HPC is heavily used or if someone runs a job on the login node, learners might not be able to log in or there are significant delays in getting jobs into queues which again affects the timing of the workshop.
All these mentioned issues (and probably more) can be addressed by having a dedicated HPC for training. But usually “real” HPCs are very expensive and it wouldn’t be feasible to purchase typical high-end HPC hardware just for a training setup. However, it is completely possible to use low-end hardware to create a cluster that will run almost all the required software to learn how to use an HPC.
Minimal requirements
- Raspberry Pi (RPi) 2GB+ single board computers (SBC): 1 for the head
node, plus as many nodes as as you want
- Preference 64-bit Pis (i.e. version 3 and up). Prior versions have slower clock speeds resulting in learners having to wait longer for commands to complete, which can slow down workshops.
- A multiport Netgear switch (as many ports as Rasberry Pis)
- 10BaseT Cat6 ethernet cables (1 per Rasberry Pi)
- Power supplies for each Rasberry Pi (alternatively: use a PoE switch to power all Rasberry Pis)
- A 8GB flash drive for shared storage
- A 32GB SD card to boot the main node from
- Cooling device (e.g. USB desktop fan)
We can in theory omit the network switch using a crossover ethernet cable, but YMMV.
Hardware connections
The diagram below shows how the components connect. The login node
has two network interfaces: eth0 connects to the internal
switch, and wlan0 connects to the router so learners can
reach the cluster over WiFi.
%%{init:
  {"themeVariables": {"edgeLabelBackground": "#ffffff00"}}
}%%
graph TD
    accTitle: MiniHPC hardware connections: power and network topology
    accDescr {A diagram showing how the hardware for this lesson is connected together.}
    Mains[Mains socket] --> PSU[Power strip]
    PSU -->|USB-A to barrel| Switch["Network switch<br/>■ ■ □ □ □"]
    Switch -->|ethernet| node01
    PSU -->|USB-C| node01["node01: login node"]
    PSU -->|USB-C| nodeN["node02 (to nodeNN): compute"]
    Switch -->|ethernet| nodeN
    Router[WiFi router] -->|wlan0| node01
    Laptops[Learner laptops] -->|WiFi| Router

    style Mains   fill:orange, stroke:orange, color:black
    style PSU     fill:orange, stroke:orange, color:black
    style Switch  fill:steelblue, stroke:steelblue, color:white
    style Router  fill:steelblue, stroke:steelblue, color:white
    style node01  fill:seagreen, stroke:seagreen, color:white
    style nodeN   fill:seagreen, stroke:seagreen, color:white
    style Laptops fill:gray, stroke:gray, color:white

    linkStyle 0,1,3,4 stroke:orange, stroke-width:4px
    linkStyle 2,5     stroke:steelblue, stroke-width:4px
    linkStyle 6,7     stroke:darkorchid, stroke-width:4px
Optional
- Example of casing:
- 3D printed DIN Rail stand
- 3D printed RPi cases
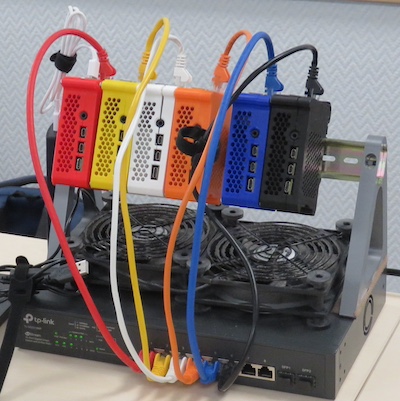
The first CarpentriesOffline MiniHPC, pixie, created
with Raspberry Pis!
Further reading
Once your mini-HPC is up and running, the Introduction to High-Performance Computing lesson from The Carpentries Incubator covers how to use an HPC cluster: submitting jobs with SLURM, working with modules, and running parallel workloads with MPI.
- A mini-HPC using Raspberry Pis solves common HPC training challenges: cost, restricted access, internet dependency, and resource contention
- The minimum hardware is one or more Raspberry Pis (minimum version 3, preferably v4+/2GB+ RAM), a network switch, ethernet cables, SD cards, and a USB storage device.